Almost there...
Tuesday, March 29, 2011
Sunday, March 20, 2011
Finished at last!
For something different, how about an almost wordless Sunday? Dan's harness is done.I didn't notice the breeching was sitting wonky until after I had uploaded the pictures (of course).
Labels:
harness
I have an ISH!
On Friday I received mail of the exciting kind - an ISH body!
I've been looking for one for ages to use for my tack, as he is an extremely popular mould, and I had heard that he is a bit smaller than the Breyers. Even though there are $25 bodies in the US, the cost of shipping them to Australia would probably be around $25 again.
A few months ago, Stone had second-quality bodies in their eBay store for about $20. I was contemplating buying one then, but they sold out before I could purchase one.
By the looks of the seams on this guy, I think he may have been one of those second-quality models. Good thing I'm not a customiser!
I've been looking for one for ages to use for my tack, as he is an extremely popular mould, and I had heard that he is a bit smaller than the Breyers. Even though there are $25 bodies in the US, the cost of shipping them to Australia would probably be around $25 again.
A few months ago, Stone had second-quality bodies in their eBay store for about $20. I was contemplating buying one then, but they sold out before I could purchase one.
By the looks of the seams on this guy, I think he may have been one of those second-quality models. Good thing I'm not a customiser!
Labels:
supplies
Sunday, March 13, 2011
Collar day
(Technically Dan's harness is finished, but there are a couple of adjustments she would like fixed before I share it with my readers. So, you'll just have to wait!)
Yesterday I decided to bite the bullet and attempt a practise collar for Lisa's harness, using the tutorial found in issue VIII of the Model Horse Magazine.
(Apologies for the photos - I don't have a scanner.)
With only the picture to try and copy the pattern from, I ended up drawing it free hand (with lots of guessed measurements to try and keep it even). Unfortunately the tutorial does not mention how high the curve should be, nor the distance from the middle or anything else that may be of help.
After turning the collar right side out, I found it look like something a little familiar.
I didn't have any 'felt scraps', so I found some ugly brown felt that I swear had been waiting for this project, and chopped it into tiny pieces. Stuffing the collar took longer than I expected - around fifteen minutes - and by the time I'd finished, I had invisible bits of wool felt everywhere over my skin. Worst feeling ever.
Stitching up the hole was difficult - sewing the collar earlier had been difficult, but this was just downright hard. My poor finger. :( I attached the hames, and yay!
According to the tutorial I'm all finished, but either I missed something or the tutorial missed a step. Because my collar shouldn't be able to do this.
Or this:
On a real collar, the hames are definitely fixed in place and do not move around. I looked at many different pictures of collars, and the only difference I can see is that there is a deep groove or channel on the collar that the hames sits in. That's all I can see that would hold the hames onto the collar in such a fixed position. Unless they are using glue or something behind, but I doubt it.
I think I will need to use some black thread in places where it won't be seen in order to keep the hames tight against the collar. I'm reluctant to use glue in case it discolours or causes damage to the hames, and I don't want to leave the hames loose as there is just way too much potential for damage to a model.
Other than that major issue, it looks nice from the front.
I am considering whether I should adjust the pattern slightly, since it seems like the curve came out steeper. Unfortunately Lauren hasn't provided any side-on pictures of the collar in the tutorial, and it seems her website is no longer available. I'll need to do more thinking before I decide to change the pattern or not.
Yesterday I decided to bite the bullet and attempt a practise collar for Lisa's harness, using the tutorial found in issue VIII of the Model Horse Magazine.
(Apologies for the photos - I don't have a scanner.)
With only the picture to try and copy the pattern from, I ended up drawing it free hand (with lots of guessed measurements to try and keep it even). Unfortunately the tutorial does not mention how high the curve should be, nor the distance from the middle or anything else that may be of help.
After turning the collar right side out, I found it look like something a little familiar.
I didn't have any 'felt scraps', so I found some ugly brown felt that I swear had been waiting for this project, and chopped it into tiny pieces. Stuffing the collar took longer than I expected - around fifteen minutes - and by the time I'd finished, I had invisible bits of wool felt everywhere over my skin. Worst feeling ever.
Stitching up the hole was difficult - sewing the collar earlier had been difficult, but this was just downright hard. My poor finger. :( I attached the hames, and yay!
According to the tutorial I'm all finished, but either I missed something or the tutorial missed a step. Because my collar shouldn't be able to do this.
Or this:
On a real collar, the hames are definitely fixed in place and do not move around. I looked at many different pictures of collars, and the only difference I can see is that there is a deep groove or channel on the collar that the hames sits in. That's all I can see that would hold the hames onto the collar in such a fixed position. Unless they are using glue or something behind, but I doubt it.
I think I will need to use some black thread in places where it won't be seen in order to keep the hames tight against the collar. I'm reluctant to use glue in case it discolours or causes damage to the hames, and I don't want to leave the hames loose as there is just way too much potential for damage to a model.
Other than that major issue, it looks nice from the front.
I am considering whether I should adjust the pattern slightly, since it seems like the curve came out steeper. Unfortunately Lauren hasn't provided any side-on pictures of the collar in the tutorial, and it seems her website is no longer available. I'll need to do more thinking before I decide to change the pattern or not.
Labels:
harness
Thursday, March 10, 2011
Visit, and Lisa's harness
Yesterday I spent most of the day at Lisa's new property. Her previous location was on the other side of the city, around 2-3 hours from me, and now she only lives half an hour away! This is very exciting as now I can go drool at her ponies as often as she will let me.
We had several goals to accomplish while I was there. First and foremost, to meet her new Welsh ponies, Trinity and Precious (who are adorable). We also had to brainstorm out the rosettes we are going to order for our joint-run live show, Performance Extravaganza, which will be in August this year, and also work out new colours to be used for her live show, Mini Mania, in May.
The last goal was to attain measurements of her Depeche resin so I can start on his harness. Of course I forgot to take my measurement list with me, but I guess I can always go up and take new measurements if needed. ;)
We had some time to kill after lunch, so also went through her (huge!) tack collection to cull out the items she no longer uses to put up for sale. I think Lisa has more classic saddles than traditional - which is curious as she has far more traditional-sized models! We discovered a number of pieces that could be better (and fetch a better price) if spruced up, so I've taken those home to have a play with and see what I can do. These items are from when she first started collecting in early 2000s.
So here are the items, untouched, and what I plan to do to them.
Smallish classic Western saddle. I intend to redo both cinches and put etched buckles on. Remove the tapaderos, since they are only legal for Western Parade and this saddle isn't all that flash. Add straps to the breastplace, and possibly make a new one. I may also play with putting some excess leather underneath the cantle to push the back up, as the saddle is not made on a tree.
Black large classic Western bridle with black and white romal reins. I will put on a new headstall and bit. The reins are pretty cool - they are posable like rawhide, but feel more like waxed cotton or something, so I don't intend to play with those.
Traditional one-ear Western bridle with carved cheekpieces , rawhide romal reins and fancy bit. I really like the bit on this bridle. It looks handmade and is really different. It almost looks like a parade bit. The cheekpieces will stay, but I will give it a new headstall and change the buckles to tongue buckles. I will probably also upgrade the reins.
Traditional bridle with nylon purple brow and nosebands. Basically I will only be salvaging the hardware from this bridle, and using it on a purple and white racing bridle for Lisa.
Classic hackamore bridle with rawhide bosal. The bosal is REALLY cute. I would totally be buying it if I had any young horses to use it on. New headstall and cheekpieces, new reins (will attempt to tie a mecate too!)
I REALLY want to start working on this right now, but since the carts are finished, Lisa's harness is more important. I think I will keep these spruce-up items as treats to do once the harness is finished.
We had several goals to accomplish while I was there. First and foremost, to meet her new Welsh ponies, Trinity and Precious (who are adorable). We also had to brainstorm out the rosettes we are going to order for our joint-run live show, Performance Extravaganza, which will be in August this year, and also work out new colours to be used for her live show, Mini Mania, in May.
The last goal was to attain measurements of her Depeche resin so I can start on his harness. Of course I forgot to take my measurement list with me, but I guess I can always go up and take new measurements if needed. ;)
We had some time to kill after lunch, so also went through her (huge!) tack collection to cull out the items she no longer uses to put up for sale. I think Lisa has more classic saddles than traditional - which is curious as she has far more traditional-sized models! We discovered a number of pieces that could be better (and fetch a better price) if spruced up, so I've taken those home to have a play with and see what I can do. These items are from when she first started collecting in early 2000s.
So here are the items, untouched, and what I plan to do to them.
Smallish classic Western saddle. I intend to redo both cinches and put etched buckles on. Remove the tapaderos, since they are only legal for Western Parade and this saddle isn't all that flash. Add straps to the breastplace, and possibly make a new one. I may also play with putting some excess leather underneath the cantle to push the back up, as the saddle is not made on a tree.
Black large classic Western bridle with black and white romal reins. I will put on a new headstall and bit. The reins are pretty cool - they are posable like rawhide, but feel more like waxed cotton or something, so I don't intend to play with those.
Traditional one-ear Western bridle with carved cheekpieces , rawhide romal reins and fancy bit. I really like the bit on this bridle. It looks handmade and is really different. It almost looks like a parade bit. The cheekpieces will stay, but I will give it a new headstall and change the buckles to tongue buckles. I will probably also upgrade the reins.
Traditional bridle with nylon purple brow and nosebands. Basically I will only be salvaging the hardware from this bridle, and using it on a purple and white racing bridle for Lisa.
Classic hackamore bridle with rawhide bosal. The bosal is REALLY cute. I would totally be buying it if I had any young horses to use it on. New headstall and cheekpieces, new reins (will attempt to tie a mecate too!)
I REALLY want to start working on this right now, but since the carts are finished, Lisa's harness is more important. I think I will keep these spruce-up items as treats to do once the harness is finished.
Sunday, March 6, 2011
Almost there!
So close, and yet so far.
Dan's entire harness is about 99% finished. At this point all I have left to do is the browband as I'm waiting on some 6mm blue leather to appear. And then I'll be finished!
Not quite rejoicing yet though. It pays to be cynical sometimes - there will probably be something that needs changing once it's in Dan's hands. I hassled her for about 30 different measurements during the week before she sent Ricky off to be repainted, and I am fairly confident that the blinkers will be sitting correctly.And if not, well, we won't find out until Ricky is home again, closer to the end of the year.
I was going to post pictures, but as I was editing them, I noticed a few bits that needed some work, so for once this will be a pictureless post!
Dan's entire harness is about 99% finished. At this point all I have left to do is the browband as I'm waiting on some 6mm blue leather to appear. And then I'll be finished!
Not quite rejoicing yet though. It pays to be cynical sometimes - there will probably be something that needs changing once it's in Dan's hands. I hassled her for about 30 different measurements during the week before she sent Ricky off to be repainted, and I am fairly confident that the blinkers will be sitting correctly.And if not, well, we won't find out until Ricky is home again, closer to the end of the year.
I was going to post pictures, but as I was editing them, I noticed a few bits that needed some work, so for once this will be a pictureless post!
Labels:
harness
Thursday, February 17, 2011
The Clean
I cleaned my desk last week.
Why is this worth a blog post? Because I am a truly, ridiculously, maddeningly messy person. I feel for the next person I move in with. And I like making fun of my inability to keep anything clean.
My tiny computer desk is also the place where I make tack, so when you sit at one place, day after day, and are as untidy as I am, things tend to get a little filthy.
The clean started because I could not find the bridle for one of my models. I searched my tack box , the shelf, and my old photo-taking area (which is now just a junk-holding area), but nada. Then I turned and eyed the desk. It had to be in there.
I found the ribbon browband from the bridle relatively easily, but before I go any further, let me tell you what else I found. Keep in mind that when I said I was messy, I am REALLY messy.
I found:
- 12 bobby pins
- 9 mini wooden pegs (that I use to hold drying work together
- 17 tiny elastic bands used for braiding a horse's mane (in my case, used for holding hanks of lace)
- 24 (!) browbands of various sizes and colours
- 6 paperclips
- 5 single model horse boots, none of them matching
- 16 1/16" D-rings
- 7 Australian one- and two-cent coins. These coins haven't been in circulation for over 20 years, yet I still hang onto them. Why?
- 1 classic harness shaft loop
Little bit hilarious, isn't it?
I did eventually find the rest of the bridle, but by the time I did, it was too dark for photos. That'd be right.
So instead I turned my attention to my new glue, Helmar 450 Quick Dry Adhesive. To test its mettle, I made a traditional silver Western show halter:
and then a bridle:
At this point, I've discovered a flaw. The glue is super stringy when wet. If you're not careful, you can end up with cobweb-like bits of glue all over the place. They are easy to cut off when dry, but they are annoying
I have a love-hate relationship with the lid on the bottle. It's a twist cap - twist up to open the bottle, twist down to close - instead of a removable cap like on Duco. This is good as you can't lose the cap, but the design also means that if you forget to close the cap, you can find a great bubble of glue forming on the top.
Other than that, the glue itself seems relatively strong. The connection holds well and doesn' come apart easily. So, happy with the glue, I turned my attention to Dan's harness.
I finished off the girth and belly band with Duco, since that is what I started using on it. I'm not entirely happy with it - there is a glue mark on the very bottom, so if I have time I will remake the girth.
Next came the breeching, which I spent today working on. And then I discovered 450's deep dark secret.
It doesn't like tragacanth-treated leather. At all.
That's the backing of the breeching coming off the stitch-marked piece.
(This probably didn't show up with the test pieces as they were made with natural leather, and I don't treat that colour due to colour changes.) I'm annoyed, but I think I may be able to work around it by only treating the piece after it is complete.
I did manage to get all of the breeching and the backstrap and crupper finished today, using Duco.
It is sitting a bit high on bubble-butt Lady Phase here, but Ricky's butt is not as big so it will sit properly on him.
I also started on the breastplate. The blue piping/trim is done, and I've attached the traces, but there is still a bit of work to go yet.
I still haven't touched the bridle yet. Oops.
Why is this worth a blog post? Because I am a truly, ridiculously, maddeningly messy person. I feel for the next person I move in with. And I like making fun of my inability to keep anything clean.
My tiny computer desk is also the place where I make tack, so when you sit at one place, day after day, and are as untidy as I am, things tend to get a little filthy.
The clean started because I could not find the bridle for one of my models. I searched my tack box , the shelf, and my old photo-taking area (which is now just a junk-holding area), but nada. Then I turned and eyed the desk. It had to be in there.
I found the ribbon browband from the bridle relatively easily, but before I go any further, let me tell you what else I found. Keep in mind that when I said I was messy, I am REALLY messy.
I found:
- 12 bobby pins
- 9 mini wooden pegs (that I use to hold drying work together
- 17 tiny elastic bands used for braiding a horse's mane (in my case, used for holding hanks of lace)
- 24 (!) browbands of various sizes and colours
- 6 paperclips
- 5 single model horse boots, none of them matching
- 16 1/16" D-rings
- 7 Australian one- and two-cent coins. These coins haven't been in circulation for over 20 years, yet I still hang onto them. Why?
- 1 classic harness shaft loop
Little bit hilarious, isn't it?
I did eventually find the rest of the bridle, but by the time I did, it was too dark for photos. That'd be right.
So instead I turned my attention to my new glue, Helmar 450 Quick Dry Adhesive. To test its mettle, I made a traditional silver Western show halter:
and then a bridle:
At this point, I've discovered a flaw. The glue is super stringy when wet. If you're not careful, you can end up with cobweb-like bits of glue all over the place. They are easy to cut off when dry, but they are annoying
I have a love-hate relationship with the lid on the bottle. It's a twist cap - twist up to open the bottle, twist down to close - instead of a removable cap like on Duco. This is good as you can't lose the cap, but the design also means that if you forget to close the cap, you can find a great bubble of glue forming on the top.
Other than that, the glue itself seems relatively strong. The connection holds well and doesn' come apart easily. So, happy with the glue, I turned my attention to Dan's harness.
I finished off the girth and belly band with Duco, since that is what I started using on it. I'm not entirely happy with it - there is a glue mark on the very bottom, so if I have time I will remake the girth.
Next came the breeching, which I spent today working on. And then I discovered 450's deep dark secret.
It doesn't like tragacanth-treated leather. At all.
That's the backing of the breeching coming off the stitch-marked piece.
(This probably didn't show up with the test pieces as they were made with natural leather, and I don't treat that colour due to colour changes.) I'm annoyed, but I think I may be able to work around it by only treating the piece after it is complete.
I did manage to get all of the breeching and the backstrap and crupper finished today, using Duco.
It is sitting a bit high on bubble-butt Lady Phase here, but Ricky's butt is not as big so it will sit properly on him.
I also started on the breastplate. The blue piping/trim is done, and I've attached the traces, but there is still a bit of work to go yet.
I still haven't touched the bridle yet. Oops.
Tuesday, February 8, 2011
Glue hunt
Mail day! My TWMHC order arrived.
Hames for Lisa's harness, two pairs of racing stirrups (one set for Dan, the other for my DUN donation), two bits for the two harnesses, one bit for me and some hooks.
It's Tuesday which is shopping day for me (lol) since it's my day off. As I promised earlier, I went glue hunting.
Unfortunately, the bargain gods weren't smiling on me today and I only came home with four.
Three, technically. I know the Tarzan's Grip glue isn't great for bridles, but its tendency to go stringy does have a benefit - it can be pulled off if I forget to wipe it off. (See the trim on the harness saddle below - that visible glue will come right off with no damage.)
The other three glues are not ones I've tried before. The 450 was recommended to me by the cashier at Riot Art (who asked when the wedding was when I said I make miniature bridles :P), and I bought the little red craft glue bottle because it sounded feasible. The Selley's tube says the glue won't dry too quickly, but it might be worth a try. If it doesn't work for me, I'm sure my dad (handyman) will find a use for it!
To test out the glues I'll spend today making a few halters. I may also make a set of boots to see if any of the glues will work with my skiver (which is unfortunately weatherproofed).
Hames for Lisa's harness, two pairs of racing stirrups (one set for Dan, the other for my DUN donation), two bits for the two harnesses, one bit for me and some hooks.
It's Tuesday which is shopping day for me (lol) since it's my day off. As I promised earlier, I went glue hunting.
Unfortunately, the bargain gods weren't smiling on me today and I only came home with four.
Three, technically. I know the Tarzan's Grip glue isn't great for bridles, but its tendency to go stringy does have a benefit - it can be pulled off if I forget to wipe it off. (See the trim on the harness saddle below - that visible glue will come right off with no damage.)
The other three glues are not ones I've tried before. The 450 was recommended to me by the cashier at Riot Art (who asked when the wedding was when I said I make miniature bridles :P), and I bought the little red craft glue bottle because it sounded feasible. The Selley's tube says the glue won't dry too quickly, but it might be worth a try. If it doesn't work for me, I'm sure my dad (handyman) will find a use for it!
To test out the glues I'll spend today making a few halters. I may also make a set of boots to see if any of the glues will work with my skiver (which is unfortunately weatherproofed).
Labels:
supplies
Slow progress
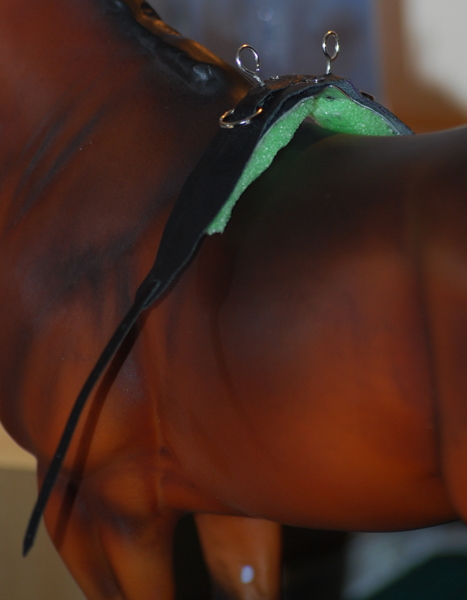
I am, technically, halfway through making the bridle for Dan's harness bridle, but the blinkers are driving me up the wall. My inability to cut straight is showing on the blinkers and it's affecting my mood. to work on them. So I've moved onto the harness saddle instead.
It is
very
slow
progress.
Since taking these pictures I've made shaft loops and added straps for the belly band and shaft loop height, but unfortunately everything else (breastplate, breeching, girth, belly band, false martingale and of course reins) all rely on measurements. I have also picked off all the glue visible on the saddle's trim. Nothing like a camera flash to pick up on all of the flaws.
It is
![]() |
very
slow
progress.
Since taking these pictures I've made shaft loops and added straps for the belly band and shaft loop height, but unfortunately everything else (breastplate, breeching, girth, belly band, false martingale and of course reins) all rely on measurements. I have also picked off all the glue visible on the saddle's trim. Nothing like a camera flash to pick up on all of the flaws.
Labels:
harness
Wednesday, February 2, 2011
*sigh*
My glue died.
I hate when this happens.
And of course it always happens when I'm in the middle of making something. Murphy's law, eh? (For what it's worth, this house was built by a Murphy, and the previous owners were Murphys, so I think we are fairly well steeped in it by now.)
I'm on my last tube of Duco Cement, but I don't think I'm too upset. Next week I will hit up Kmart, Big W, Safeway, Coles and Riot Art, buy all the glues I can find that are reasonably priced and seem like they might do a reasonable job, and then come home and experiment.
Really, I'm not a huge fan of Duco - it doesn't really dry clear, it's really runny (especially when it's a warm day), and just tends to go everywhere. I have been considering investing in a dispenser like this or like this, as the nozzle on most glue tubes is far too big and you have little control once the glue decides to come oozing on out. I have heard of some tackmakers squeezing out a small amount of glue at a time onto a piece of paper and then using a toothpick to apply it, but since Duco dries fairly quickly, this method thus far hasn't worked for me. Maybe I can try this again if I find another glue that I like that takes a little longer to dry.
In other news, Dan received her racing set gift from me and not only is it (almost) a perfect fit, but she's really thrilled with it. :D Not bad for working off measurements! Only the browband needs to be adjusted, which is an easy job and should only take a few minutes. The saddlepad is from another set; Ruffian, show name Miss Melbourne, will eventually have a white saddlepad.
Next up for Dan will be another racing set, this time for Smarty Jones - a much easier task, seeing as I actually own a Smarty! I'm not sure on colours yet, but I think green will be nice on him.
The Western halter order from a few posts down has been received as well. I was a bit anxious about this order - always am when an order is made purely from measurements. Thankfully the halter looks excellent and has no issues with fit! The customer has promised photos for the blog, so I hope to share them soon.
I've started making progress on the harness orders. Lisa has dropped her order down to one harness for now. Both she and Dan are ordering trad spider phaetons from Cheryl Campbell of Argyle Farm. I still haven't managed to get up to Lisa's yet to take measurements, so I've started working on what little I can. So far for hers I have done the trace carriers, and prepped heaps of lace. I've got a little further on Dan's; as well as trace carriers, I've started the hanging buckles for the breastplate and breeching, started to work on the saddle, and tonight I started on the bridle since I now have measurements.
With these harnesses, I get to try a new method of stuffing for the saddle. Earlier in the year I purchased a pool noodle, whose foam will be used underneath the saddle. Hopefully. It's a nice dense foam that mostly holds its shape even when the girth will be done up (the stuffing I used on my classic harness last year collapsed as soon as the girth was buckled), and so should give a nice outline. Hopefully it won't be killed by any glue I need to use on it!
I hate when this happens.
And of course it always happens when I'm in the middle of making something. Murphy's law, eh? (For what it's worth, this house was built by a Murphy, and the previous owners were Murphys, so I think we are fairly well steeped in it by now.)
I'm on my last tube of Duco Cement, but I don't think I'm too upset. Next week I will hit up Kmart, Big W, Safeway, Coles and Riot Art, buy all the glues I can find that are reasonably priced and seem like they might do a reasonable job, and then come home and experiment.
Really, I'm not a huge fan of Duco - it doesn't really dry clear, it's really runny (especially when it's a warm day), and just tends to go everywhere. I have been considering investing in a dispenser like this or like this, as the nozzle on most glue tubes is far too big and you have little control once the glue decides to come oozing on out. I have heard of some tackmakers squeezing out a small amount of glue at a time onto a piece of paper and then using a toothpick to apply it, but since Duco dries fairly quickly, this method thus far hasn't worked for me. Maybe I can try this again if I find another glue that I like that takes a little longer to dry.
In other news, Dan received her racing set gift from me and not only is it (almost) a perfect fit, but she's really thrilled with it. :D Not bad for working off measurements! Only the browband needs to be adjusted, which is an easy job and should only take a few minutes. The saddlepad is from another set; Ruffian, show name Miss Melbourne, will eventually have a white saddlepad.
Next up for Dan will be another racing set, this time for Smarty Jones - a much easier task, seeing as I actually own a Smarty! I'm not sure on colours yet, but I think green will be nice on him.
The Western halter order from a few posts down has been received as well. I was a bit anxious about this order - always am when an order is made purely from measurements. Thankfully the halter looks excellent and has no issues with fit! The customer has promised photos for the blog, so I hope to share them soon.
I've started making progress on the harness orders. Lisa has dropped her order down to one harness for now. Both she and Dan are ordering trad spider phaetons from Cheryl Campbell of Argyle Farm. I still haven't managed to get up to Lisa's yet to take measurements, so I've started working on what little I can. So far for hers I have done the trace carriers, and prepped heaps of lace. I've got a little further on Dan's; as well as trace carriers, I've started the hanging buckles for the breastplate and breeching, started to work on the saddle, and tonight I started on the bridle since I now have measurements.
With these harnesses, I get to try a new method of stuffing for the saddle. Earlier in the year I purchased a pool noodle, whose foam will be used underneath the saddle. Hopefully. It's a nice dense foam that mostly holds its shape even when the girth will be done up (the stuffing I used on my classic harness last year collapsed as soon as the girth was buckled), and so should give a nice outline. Hopefully it won't be killed by any glue I need to use on it!
Subscribe to:
Posts (Atom)


