I'm sure you're all sick of hearing about my (what feels like) unending journey with saddles! Don't worry,. I'm starting to tire a little of it too and will take a break shortly, but right now I need to go through what's wrong with #3 so I can try and review it for #4.
For reference, I was attempting a general-purpose saddle.
The Tree
Glue spots aside, I had two other issues with the tree.
The first involves the arms at the front. In the KeriOkie pattern, the arms of her tree fit into slots in the upper flap piece. While this might be closer to true life, I think a few hobby tackmakers choose to forego the arms, and just glue the finished tree right on. Honestly, trying to get the arms to fit into the flap was just a pain in the butt, and more than once I had to hack them down to get them to fit into the rest of the saddle shape. This means there are bits of where the foam is visible (the blue spots here and there). Decision: the arms will be removed from the tree pattern.
Thought: I also wouldn't mind putting in a bit of a cut back as well. Right now it's pretty flat through the front.
(Edit: The more I look at the picture above, the more I wonder if it is just my blondeness not realising that there's a cut back already in there.... Gosh, I have my moments sometimes. Will have to experiment and see if I can work with it before I go and scrap this tree pattern.)
And I think the tree that made it into the saddle is bent in the wrong place too, maybe a touch too forward? It's not a soft curve either, but I think that may be more a result of assembly and me getting frustrated.
Next up is the cantle. For this saddle I chose not to use the blocking method to stretch the method, and I think this decision had a run-on effect in terms of the creases in the seat and the ugly finishing on the rear of the cantle. Decision: return to blocking out the seat skiver.
The Flaps
In the photos, it appears that the lower flaps are poking out from underneath. Though it's not really visible when the saddle is held in the hand, I think that my pattern failed to take into account things like the roundness of the horse's barrel, the assembly, thickness of the leather, etc. The lower flap is shorter than the upper, but I don't think by enough. Decision: make the upper flap longer/trim the lower flap shorter.
Flap shape: I showed Lisa a photo of the saddle on Sunday, and she suggested that the flaps were too round. I just cruised around online briefly now, and found a good photo of this Tekna saddle (no model number) on a horse:
It's a pretty good shape, so I think I will use that as the basis for the next pattern. (But really, I know next to nothing about flap shape. I just found this interesting blog by a saddle-fitter and in this post she talks about billet position and how it's not a one-size-fits-all scenario for horses. I'm planning to go back further through her archives and see what else I can find!)
In previous posts I talked about wanting to get rid of the 'junk' in the pommel area, where it's clearly visible how the pieces and layers intersect. I thought that if I made the channel between the panels underneath wider at the front end, I would be able to lift the very front of the lower flaps higher, and thus be able to over it with skiver and hide it away a little.
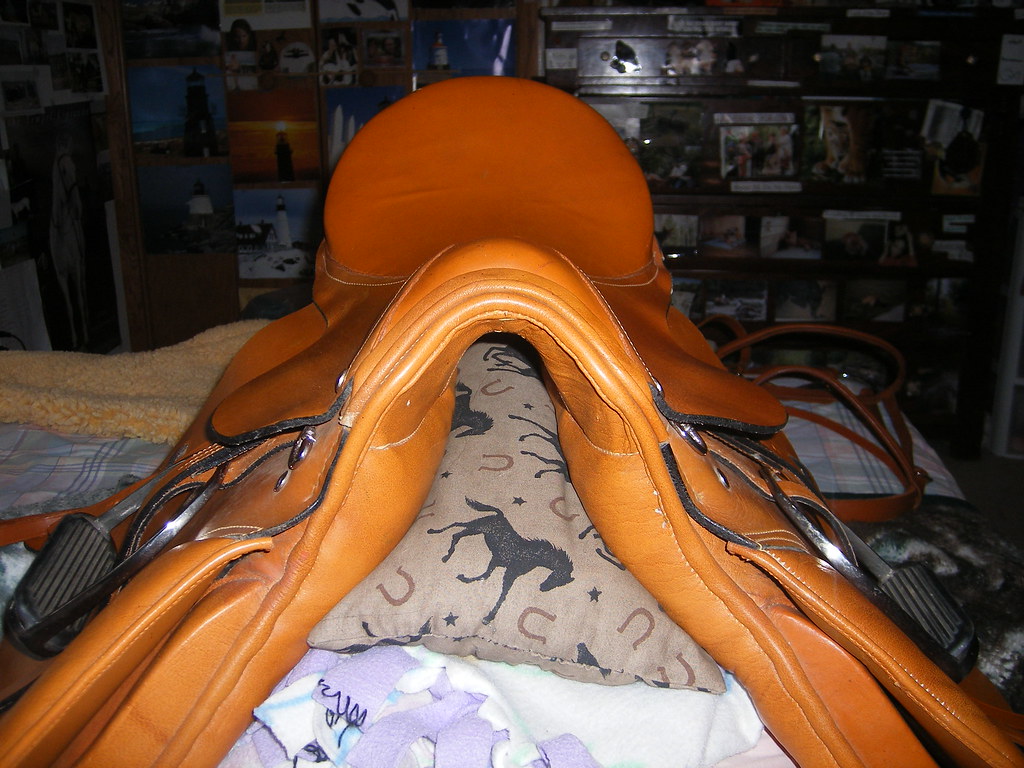
I kind of failed in this aspect; in assembly I forgot about my idea to try and hide that area away, so while there is more room there for a high wither, it still looks messy. For reference, here's a great picture of an English pommel.
Click for a bigger version.
And here's my saddle, haha:
(Click to see it in all its messy glory.)
The real saddle is so smooth and big! I love that everything is drawn in and tidily hidden away. It all blends seamlessly together. I'm wondering if the key might be to eliminate the front bar on the lower flap - this part here:
That would eliminate the whole 'hiding it away' part of the process if there wasn't actually anything there to hide. And then one long piece of skiver could be used to create the roll of piping in the pommel, and then it would follow the length of the saddle underneath and be the piece that sits behind the panels, if that makes sense. (Edit: just learnt that this piece is called the sweat flap!)
The Skirt
The skirt shrunk somehow, so needs to be wider (pommel to cantle), but I think the height is pretty reasonable. I also screwed up several times putting the pins in, which left holes in the skirt. The pins are still wonky, so I definitely need to fix that for next time.
The Panels
One thing I didn't like about the panels on saddle #2 was how the panels showed the definition of the two levels of foam. I had a genius idea of flipping the panels over, so that the panels still have the depth afforded by the two pieces, but it's not visible. Success!
I did use the blocking method on the skiver used to cover the panels and underside of the lower flaps, but still have some ugly wrinkles. As much as I like the look of the blocking method, I might use a method I've seen other tackmakers use - wrapping the panels individually and then attaching them to the saddle. That way I might be able to get the bend in the foam and ensure the leather follows through as well.
I also just noticed that the panels are wonky - one is longer than the other. Le sigh.
Something went terribly wrong at some point. I mentioned this in an earlier post that the section of the lower flap that holds the back of the panels somehow ended up wider that the seat. At least now I've identified it, I think it will be an easy fix - just make the rounded ends of the panels smaller and not so wide - so it shouldn't occur on the next saddle. Hopefully.
Other Stuff
Just a couple of other little things. The D-rings should be back a little (when I make the skirt bigger next time, they should be hidden underneath), and I think the stirrup keeper needs to be down a little more as well.
Any other criticism I need to take into account before I tackle the new pattern?
And I promise the next post will have nothing to do with saddles!
Tuesday, July 3, 2012
C'est fini!
Well, it's done.
I don't particularly like it, but it is finished.
At this point all I can see are the faults and things that need to be fixed.
I wanted to take this to WA in two weeks and show with it at Ultimate Gold Live, but, lol, that's so not happening.
Instead, I'm going to review the faults and things I don't like with this saddle, do some more pattern surgery, and go head down, bum up and work on another incarnation.
And order some stirrups from Allison!
I don't particularly like it, but it is finished.
At this point all I can see are the faults and things that need to be fixed.
I wanted to take this to WA in two weeks and show with it at Ultimate Gold Live, but, lol, that's so not happening.
Instead, I'm going to review the faults and things I don't like with this saddle, do some more pattern surgery, and go head down, bum up and work on another incarnation.
And order some stirrups from Allison!
Friday, June 29, 2012
Saddle #3, part 1
This pattern making thing is hard!
It took me four goes to come up with a free-hand flap shape and size of a saddle I was happy with. And throughout the construction process I had to remake some patterns several times again, though I expect that's pretty normal for constructing a new pattern. The pattern above is for the general flap and seat size - from this pattern I made multiples and used that to construct the other pieces.
What I didn't expect was the number of times my fat fingers would get glue marks on something once I got into the messy side of things. As per my previous post, the upper flap piece has been redone, and I've had to redo the seat three times as well. Due to the cold weather here, we've had the ducted heating on high which is making my glue runny, but obviously I have to foot some of the blame too!
Tonight I got seat three mostly done, and started to pretend-assemble the pieces so I could see where to cut the slots for the tree. And, um...
The tree is not completely around in the seat area, and it's not big enough to cover the padding underneath it. (You can't see it very well in the photo, but the padding from the lower flap sticks out the side a bit.)
I think the location of the tree is fine, just the seat area needs to be wider to ensure it's flush with the edge of the padding. Should be an easy-enough fix, hopefully.
Back to the graph paper for tree number 5!
It took me four goes to come up with a free-hand flap shape and size of a saddle I was happy with. And throughout the construction process I had to remake some patterns several times again, though I expect that's pretty normal for constructing a new pattern. The pattern above is for the general flap and seat size - from this pattern I made multiples and used that to construct the other pieces.
What I didn't expect was the number of times my fat fingers would get glue marks on something once I got into the messy side of things. As per my previous post, the upper flap piece has been redone, and I've had to redo the seat three times as well. Due to the cold weather here, we've had the ducted heating on high which is making my glue runny, but obviously I have to foot some of the blame too!
Tonight I got seat three mostly done, and started to pretend-assemble the pieces so I could see where to cut the slots for the tree. And, um...
The tree is not completely around in the seat area, and it's not big enough to cover the padding underneath it. (You can't see it very well in the photo, but the padding from the lower flap sticks out the side a bit.)
I think the location of the tree is fine, just the seat area needs to be wider to ensure it's flush with the edge of the padding. Should be an easy-enough fix, hopefully.
Back to the graph paper for tree number 5!
Wednesday, June 27, 2012
Nothing more frustrating...
...than having to start again because of this:
That's a few days' work down the drain because of a big fat mark the size of my thumb. Ugh!
Sunday, June 24, 2012
English saddle #2, part 2
I'm scowling. Lucky for you that you can't see it!
Following on from my last post re: my classic English saddle, I went ahead and added one long strip of piping around the edge of the knee rolls and upper flap, up into the pommel and down the other side. (I also took out some of the skiver bulk under the seat, and it fits better now.)
From the side, the saddle actually looks pretty good! If it weren't from the size I would quite happily photo show with this saddle. (In photo showing you wouldn't notice that the flaps are different sizes :P) I promise it looks better in real life - it's dark here and the flash washed out a lot of detail, and highlighted the unfinished edges.
The first photo is of it on a Mozart resin (very small classic), and the second photo on the loping QH mare (small classic).
Unfortunately, there's still a lot of bulk in the pommel area, despite the pieces I cut out. I only used 6mm lace to make the edge piping, and that wasn't wide enough to make the area look a little neater. And you can see the gaping big hole!
I went back to look at the KeriOkie pattern for the lower flap to see if there's anything I can modify.
The pommel area is just a flat piece of area - not very good for getting a good triangular shape underneath. It doesn't fit neatly into the pommel like on a real saddle.
I dug out this saddle construction link (here's page 1) which I bookmarked some time ago. I was looking for a good shot of the lower flaps, to see what was different between KeriOkie's pattern. No cigar on that link, though there is lots of information on there if you haven't seen it before.
Next step is to look at the book 'To Handmake a Saddle' by J. H. L. Shields. I bought this last year on Fishpond (Australian version of Amazon), and promptly put it aside as I didn't think it would be that helpful. But now, I take a look through it and what do I find? Patterns for a real life saddle!
These pages show the two side of the lower panel, complete with point pockets (pockets that hold the points of the tree in place). (Sorry about the angle, the flash washed out the pages.
Immediately I can see what I think will fix the panel problem. If you look at the cut out at the top of the real pattern, you can see it's at quite a steep angle, and the cut out is narrow near the cantle, but widens as it gets closer to the pommel. A quick look at the KeriOkie pattern shows that this cut out is relatively the same width the whole way along.
So I think that after cutting out the lower flap panel and slicing it in half, I will try arranging it to make the gullet wider at the pommel end, and lengthening that little bar at the front. That should make that section of the lower flap lift up to fit more neatly into the pommel space, and reduce the space in that area. Huzzah!
And for the curious, saddle #2 was reduced from the original pattern by 25% (75% of the original). The flaps are still miles too small, but the seat is a pretty good length for the classic QH mare. When making a pattern that implements the change above, I'll also try my hand at making the flaps bigger too. Wish me luck!
Following on from my last post re: my classic English saddle, I went ahead and added one long strip of piping around the edge of the knee rolls and upper flap, up into the pommel and down the other side. (I also took out some of the skiver bulk under the seat, and it fits better now.)
From the side, the saddle actually looks pretty good! If it weren't from the size I would quite happily photo show with this saddle. (In photo showing you wouldn't notice that the flaps are different sizes :P) I promise it looks better in real life - it's dark here and the flash washed out a lot of detail, and highlighted the unfinished edges.
The first photo is of it on a Mozart resin (very small classic), and the second photo on the loping QH mare (small classic).
Unfortunately, there's still a lot of bulk in the pommel area, despite the pieces I cut out. I only used 6mm lace to make the edge piping, and that wasn't wide enough to make the area look a little neater. And you can see the gaping big hole!
I went back to look at the KeriOkie pattern for the lower flap to see if there's anything I can modify.
The pommel area is just a flat piece of area - not very good for getting a good triangular shape underneath. It doesn't fit neatly into the pommel like on a real saddle.
[picture removed]
I dug out this saddle construction link (here's page 1) which I bookmarked some time ago. I was looking for a good shot of the lower flaps, to see what was different between KeriOkie's pattern. No cigar on that link, though there is lots of information on there if you haven't seen it before.
Next step is to look at the book 'To Handmake a Saddle' by J. H. L. Shields. I bought this last year on Fishpond (Australian version of Amazon), and promptly put it aside as I didn't think it would be that helpful. But now, I take a look through it and what do I find? Patterns for a real life saddle!
These pages show the two side of the lower panel, complete with point pockets (pockets that hold the points of the tree in place). (Sorry about the angle, the flash washed out the pages.
[picture removed]
Immediately I can see what I think will fix the panel problem. If you look at the cut out at the top of the real pattern, you can see it's at quite a steep angle, and the cut out is narrow near the cantle, but widens as it gets closer to the pommel. A quick look at the KeriOkie pattern shows that this cut out is relatively the same width the whole way along.
So I think that after cutting out the lower flap panel and slicing it in half, I will try arranging it to make the gullet wider at the pommel end, and lengthening that little bar at the front. That should make that section of the lower flap lift up to fit more neatly into the pommel space, and reduce the space in that area. Huzzah!
And for the curious, saddle #2 was reduced from the original pattern by 25% (75% of the original). The flaps are still miles too small, but the seat is a pretty good length for the classic QH mare. When making a pattern that implements the change above, I'll also try my hand at making the flaps bigger too. Wish me luck!
Sunday, June 17, 2012
English Saddle #2 - v1
I actually wrote this post back in April, set it aside to get photos for it, and promptly forgot all about it. I dug it out today because I wanted to tackle this saddle again, and have pulled it apart, not realising I never got around to taking photos. So please excuse the fact that there are a whole two photos for this post!
--
A couple of weeks after I completed my first English saddle back in April, I started working on my second English saddle from the KeriOkie book - a classic sized one.
The book provides reduction percentages for different scales, so for this saddle, I used the C1 (classic 1) ratio for this pattern, which the book classifies as being for 'models Breyer classifies as Traditional that are, in fact, a size between Traditional and Classic models, such as Scamper. Also for some of the Traditional Size ponies. C1 is 75% of T1 [the full-size pattern in the book] - reduce by 25%'.
As I started to get into cutting out the pieces, I began to wonder if I would have the same issues I had with my first saddle - the flaps being too small but the seat being the correct length. For me personally, that's not so bad, as I have several 'small classics' in need of English saddles!
As much as I was itching to start modifying the pattern and the process and making changes, I figured I should at least make one saddle in classic by the book, so I can see if any of the steps need to be dropped. I did make several small changes though.
Going on my thoughts in my last post, I discarded using the aluminium soft drink can for the seat in favour of using the 0.016" metal sheet. (This is the same stuff I use for the tree of my racing saddles.) Immediately I could feel different - it's a lot stronger and is able to put up with a lot more movement when gluing on pieces. You can see the different in made in the seat shape, too - there's actually a seat there now!
I used some of the skiver that I got from that lot earlier in the year for the seat and knee rolls, instead of skived-down roo like I did for my first saddle. This stuff is REALLY grainy compared to the roo! My roo leather has a very tight grain that's almost invisible compared to this skiver. It's also thicker, and unfortunately doesn't skive, so will probably only be good for lining things like girths. The grain also seems to be affected by stretching the leather. Take a look at this photo of the underside panels.
(Click to see a larger version)
The grain on one side is definitely larger. The smaller side is where the leather has been stretched out more. Pretty interesting - but also super annoying!
The instructions on these saddles call for two front prongs to slot into the skirt. I had a lot of trouble getting these to sit neatly in the first saddle, so I decided I cut them off the classic tree, thinking this would make assembly easier for me. Bad idea!
When it came to assembly time, the seat didn't sit neatly on the rest of the saddle, but rather floats above it (not helped by the thick skiver at the back bulking everything up).
One of the other major beefs I have with this mostly-finished saddle is the amount of junk in the pommel. I've since pulled this saddle apart somewhat and don't have a photo, but the traditional saddle is fairly similar. The instructions call for piping trim everywhere, but in small pieces, as opposed to the one or two long pieces found on real saddles.
But instead of just dumping this saddle and starting again, I'm going to try and rescue it. This is what the saddle looks like right now.
I've pulled off the seat off the saddle, removed the piping trim on the upper skirt, the trim from inside the pommel gullet, trimmed a piece out of the piping that goes around the front of the lower skirt, and cut out a piece from the very front section of the upper skirt, between the front dee-rings, to try and remove some of the bulk.
My plan is to make one long strip of piping, and run it along the front of the knee panels, up to the pommel and down the other side.
(We won't talk about how the seat has somehow become longer than everything else...)
--
A couple of weeks after I completed my first English saddle back in April, I started working on my second English saddle from the KeriOkie book - a classic sized one.
The book provides reduction percentages for different scales, so for this saddle, I used the C1 (classic 1) ratio for this pattern, which the book classifies as being for 'models Breyer classifies as Traditional that are, in fact, a size between Traditional and Classic models, such as Scamper. Also for some of the Traditional Size ponies. C1 is 75% of T1 [the full-size pattern in the book] - reduce by 25%'.
As I started to get into cutting out the pieces, I began to wonder if I would have the same issues I had with my first saddle - the flaps being too small but the seat being the correct length. For me personally, that's not so bad, as I have several 'small classics' in need of English saddles!
As much as I was itching to start modifying the pattern and the process and making changes, I figured I should at least make one saddle in classic by the book, so I can see if any of the steps need to be dropped. I did make several small changes though.
Going on my thoughts in my last post, I discarded using the aluminium soft drink can for the seat in favour of using the 0.016" metal sheet. (This is the same stuff I use for the tree of my racing saddles.) Immediately I could feel different - it's a lot stronger and is able to put up with a lot more movement when gluing on pieces. You can see the different in made in the seat shape, too - there's actually a seat there now!
I used some of the skiver that I got from that lot earlier in the year for the seat and knee rolls, instead of skived-down roo like I did for my first saddle. This stuff is REALLY grainy compared to the roo! My roo leather has a very tight grain that's almost invisible compared to this skiver. It's also thicker, and unfortunately doesn't skive, so will probably only be good for lining things like girths. The grain also seems to be affected by stretching the leather. Take a look at this photo of the underside panels.
(Click to see a larger version)
The grain on one side is definitely larger. The smaller side is where the leather has been stretched out more. Pretty interesting - but also super annoying!
The instructions on these saddles call for two front prongs to slot into the skirt. I had a lot of trouble getting these to sit neatly in the first saddle, so I decided I cut them off the classic tree, thinking this would make assembly easier for me. Bad idea!
When it came to assembly time, the seat didn't sit neatly on the rest of the saddle, but rather floats above it (not helped by the thick skiver at the back bulking everything up).
One of the other major beefs I have with this mostly-finished saddle is the amount of junk in the pommel. I've since pulled this saddle apart somewhat and don't have a photo, but the traditional saddle is fairly similar. The instructions call for piping trim everywhere, but in small pieces, as opposed to the one or two long pieces found on real saddles.
But instead of just dumping this saddle and starting again, I'm going to try and rescue it. This is what the saddle looks like right now.
I've pulled off the seat off the saddle, removed the piping trim on the upper skirt, the trim from inside the pommel gullet, trimmed a piece out of the piping that goes around the front of the lower skirt, and cut out a piece from the very front section of the upper skirt, between the front dee-rings, to try and remove some of the bulk.
My plan is to make one long strip of piping, and run it along the front of the knee panels, up to the pommel and down the other side.
(We won't talk about how the seat has somehow become longer than everything else...)
Sunday, June 10, 2012
Melb Live 2012
Things kinda died here a little while ago. (Did I really last post in April? Wow.) I have a range of excuses: I was focusing on my other blog, Lolly Addict, for a while, and then I was busy preparing for Melb Live, making a few assorted-but-boring tack pieces. So, I guess this can be an ML recap post, seeing as, you know, it's my show and all!
I think I can say without bias that ML is the biggest show in my state of Victoria, and quite possibly Australia. Despite me taking a year off from it last year for assorted reasons (some of which continue to make me wonder whether I should bother to continue with the show), it still had a big turnout this year: 22 entrants, including several proxy entries and three interstate entrants. We had over 600 horses at the show, which broke the record for the number of models that were at the last ML which was a two-day show. Those numbers might not be much compared to the turnout our American friends get with their massive, frequent shows, but it's pretty exciting stuff for lil old Australia.
Labels:
shows
Saturday, April 28, 2012
Do you see what I see?
It's not finished, but I was so excited that the raised browband and noseband worked out okay for this bridle, I just had to share!
I've always had trouble with raised browbands, but I think I found a method that works with it. Jennifer Buxton (I always try to call her Jennifer Braymere, hehe) recommends waxed linen thread, but I haven't really been able to find it, so I had been plaiting basic cotton thread, which didn't create a consistent raised shape (it was also a bit lost under the leather). So this time I tried using 0.4mm Chinese nylon knotting cord - you can get it from Tangles n Knots in lots of colours - and success!
I just need to add some padding (the brow and nosebands look a bit too narrow to me) and a tongue on the noseband, and straighten the wonky crownpiece, and it will be finished.
Yay!
Sunday, April 8, 2012
Boring bridles
I'll talk about my experimental saddle #2 in another post. I just wanted to share today's work with you.
A sale piece - classic huntseat bridle for the loping mare.
An order for WH - it is heading to her to be shown at Goulburn live show this coming weekend.
And a not-so-boring bridle - oh how I loves me some colour!
Obviously it still needs reins. I'm just trying to decide whether I should make a (racing) saddle to go with it, or sell as-is.
And yes, I finally have a Ruffian body!
A sale piece - classic huntseat bridle for the loping mare.
An order for WH - it is heading to her to be shown at Goulburn live show this coming weekend.
And a not-so-boring bridle - oh how I loves me some colour!
Obviously it still needs reins. I'm just trying to decide whether I should make a (racing) saddle to go with it, or sell as-is.
And yes, I finally have a Ruffian body!
Sunday, April 1, 2012
Skiver!
On Friday I received an item lot of skiver scraps from MHSP.
Skiver! I have real skiver - and lots of it! Two shades of brown, a black, plus natural (not pictured).
There's also a bag of tooling leather scraps and and chamois scraps too. I can't wait to start using it all!
Skiver! I have real skiver - and lots of it! Two shades of brown, a black, plus natural (not pictured).
There's also a bag of tooling leather scraps and and chamois scraps too. I can't wait to start using it all!
Labels:
supplies
Subscribe to:
Posts (Atom)


