Showing posts with label harness. Show all posts

Monday, November 19, 2012

It followed me home, Mum...

... Can we keep it? :D


Unfortunately this big boy is only here for a short stay, just long enough to get some new clothes of the leather kind. He is one of Karen Grigson's newest projects, and I don't think he has a name as yet. (He's not finished, so ignore the paint marks from Equitana, hehe).


Isn't he fantastic? I can't believe he started out as the bubble-butt Belgian! Check out those fuzzy ears - and that beard!


Karen has given me almost-free rein on the stallion rig I am to make for him. Luckily, with Shires there is lots of variety - so I have a tough choice ahead of me! I do know he is going to look absolutely swish all dressed up.


I don't know what colour his flights (ribbons) will be, so I can't do a snazzy set with coloured nylon like this


or swish coloured leather inserts like this:


(To be fair, I don't think my leather skills are good enough to pull off a bridle like that!)

But there are still plenty of other options. I could go American-style:


or give it lots of bling.


I could go a little bit plain and workman-like,


or somewhere in between.


It's so hard to choose! Sure you don't want to choose for me, Karen?

Sunday, April 10, 2011

Harness

I'm starting to feel all harnessed out.

Lisa's collar for her harness is still causing me grief. While I now have a general idea as to how I want to proceed, I have another issue - I don't have any leather left. The gloving leather (0.3mm kangaroo) I have, I bought as offcuts from someone off ebay. He has since moved overseas and has no stock left. I emailed Robyn but she could only suggest using TWMHC's stuff - but that only comes in natural and dying is not something I feel comfortable tackling right now (plus I can't afford extra accessories).

Trawling ebay has found me no bargains. I tried skiving down my roo offcuts from Amazing Oz, but I couldn't get it consistently thin enough. I've emailed them to see if they know of anywhere I could find some gloving leather - that's not lambskin or pigskin. If they don't know of anyone, then I guess Lisa will just have to deal with a breastcollar! :(

I received my pleasure cart for Fluffy (extreme custom Breyer Man O War by Sue Kern to a QH stallion) the other day so I'm challenging myself to see if I can make a pleasure harness for him before Knox City Live, which is exactly one month away.

Trying to find good reference photos is driving (ha!) me to tears. Either pleasure driving (the class for stock breeds) is not as popular as I thought, and/or I'm not using the right terms. I have a total of three or so large photos of the harness to work off of, and don't get me started on the overcheck. That is one area I know zilch about. Plus there's conflicting information on them too. Sadly I can't get away without one - Aus QHA specify it must be used. I'm just going to guess and hope I get it vaguely right.

Sunday, March 20, 2011

Finished at last!

For something different, how about an almost wordless Sunday? Dan's harness is done.I didn't notice the breeching was sitting wonky until after I had uploaded the pictures (of course).


Sunday, March 13, 2011

Collar day

(Technically Dan's harness is finished, but there are a couple of adjustments she would like fixed before I share it with my readers. So, you'll just have to wait!)

Yesterday I decided to bite the bullet and attempt a practise collar for Lisa's harness, using the tutorial found in issue VIII of the Model Horse Magazine.


(Apologies for the photos - I don't have a scanner.)

With only the picture to try and copy the pattern from, I ended up drawing it free hand (with lots of guessed measurements to try and keep it even). Unfortunately the tutorial does not mention how high the curve should be, nor the distance from the middle or anything else that may be of help.


After turning the collar right side out, I found it look like something a little familiar.


I didn't have any 'felt scraps', so I found some ugly brown felt that I swear had been waiting for this project, and chopped it into tiny pieces. Stuffing the collar took longer than I expected - around fifteen minutes - and by the time I'd finished, I had invisible bits of wool felt everywhere over my skin. Worst feeling ever.

Stitching up the hole was difficult - sewing the collar earlier had been difficult, but this was just downright hard. My poor finger. :( I attached the hames, and yay!


According to the tutorial I'm all finished, but either I missed something or the tutorial missed a step. Because my collar shouldn't be able to do this.


Or this:


On a real collar, the hames are definitely fixed in place and do not move around. I looked at many different pictures of collars, and the only difference I can see is that there is a deep groove or channel on the collar that the hames sits in. That's all I can see that would hold the hames onto the collar in such a fixed position. Unless they are using glue or something behind, but I doubt it.

I think I will need to use some black thread in places where it won't be seen in order to keep the hames tight against the collar. I'm reluctant to use glue in case it discolours or causes damage to the hames, and I don't want to leave the hames loose as there is just way too much potential for damage to a model.

Other than that major issue, it looks nice from the front.


I am considering whether I should adjust the pattern slightly, since it seems like the curve came out steeper. Unfortunately Lauren hasn't provided any side-on pictures of the collar in the tutorial, and it seems her website is no longer available. I'll need to do more thinking before I decide to change the pattern or not.

Sunday, March 6, 2011

Almost there!

So close, and yet so far.

Dan's entire harness is about 99% finished. At this point all I have left to do is the browband as I'm waiting on some 6mm blue leather to appear. And then I'll be finished!

Not quite rejoicing yet though. It pays to be cynical sometimes - there will probably be something that needs changing once it's in Dan's hands. I hassled her for about 30 different measurements during the week before she sent Ricky off to be repainted, and I am fairly confident that the blinkers will be sitting correctly.And if not, well, we won't find out until Ricky is home again, closer to the end of the year.

I was going to post pictures, but as I was editing them, I noticed a few bits that needed some work, so for once this will be a pictureless post!

Thursday, February 17, 2011

The Clean

I cleaned my desk last week.

Why is this worth a blog post? Because I am a truly, ridiculously, maddeningly messy person. I feel for the next person I move in with. And I like making fun of my inability to keep anything clean.

My tiny computer desk is also the place where I make tack, so when you sit at one place, day after day, and are as untidy as I am, things tend to get a little filthy.

The clean started because I could not find the bridle for one of my models. I searched my tack box , the shelf, and my old photo-taking area (which is now just a junk-holding area), but nada. Then I turned and eyed the desk. It had to be in there.

I found the ribbon browband from the bridle relatively easily, but before I go any further, let me tell you what else I found. Keep in mind that when I said I was messy, I am REALLY messy.

I found:
- 12 bobby pins
- 9 mini wooden pegs (that I use to hold drying work together
- 17 tiny elastic bands used for braiding a horse's mane (in my case, used for holding hanks of lace)
- 24 (!) browbands of various sizes and colours
- 6 paperclips
- 5 single model horse boots, none of them matching
- 16 1/16" D-rings
- 7 Australian one- and two-cent coins. These coins haven't been in circulation for over 20 years, yet I still hang onto them. Why?
- 1 classic harness shaft loop

Little bit hilarious, isn't it?

I did eventually find the rest of the bridle, but by the time I did, it was too dark for photos. That'd be right.

So instead I turned my attention to my new glue, Helmar 450 Quick Dry Adhesive. To test its mettle, I made a traditional silver Western show halter:


and then a bridle:


At this point, I've discovered a flaw. The glue is super stringy when wet. If you're not careful, you can end up with cobweb-like bits of glue all over the place. They are easy to cut off when dry, but they are annoying

I have a love-hate relationship with the lid on the bottle. It's a twist cap - twist up to open the bottle, twist down to close - instead of a removable cap like on Duco. This is good as you can't lose the cap, but the design also means that if you forget to close the cap, you can find a great bubble of glue forming on the top.


Other than that, the glue itself seems relatively strong. The connection holds well and doesn' come apart easily. So, happy with the glue, I turned my attention to Dan's harness.

I finished off the girth and belly band with Duco, since that is what I started using on it. I'm not entirely happy with it - there is a glue mark on the very bottom, so if I have time I will remake the girth.

Next came the breeching, which I spent today working on. And then I discovered 450's deep dark secret.

It doesn't like tragacanth-treated leather. At all.


That's the backing of the breeching coming off the stitch-marked piece.

(This probably didn't show up with the test pieces as they were made with natural leather, and I don't treat that colour due to colour changes.) I'm annoyed, but I think I may be able to work around it by only treating the piece after it is complete.

I did manage to get all of the breeching and the backstrap and crupper finished today, using Duco.


It is sitting a bit high on bubble-butt Lady Phase here, but Ricky's butt is not as big so it will sit properly on him.

I also started on the breastplate. The blue piping/trim is done, and I've attached the traces, but there is still a bit of work to go yet.

I still haven't touched the bridle yet. Oops.

Tuesday, February 8, 2011

Slow progress

I am, technically, halfway through making the bridle for Dan's harness bridle, but the blinkers are driving me up the wall. My inability to cut straight is showing on the blinkers and it's affecting my mood. to work on them. So I've moved onto the harness saddle instead.

It is

very


slow


progress.


Since taking these pictures I've made shaft loops and added straps for the belly band and shaft loop height, but unfortunately everything else (breastplate, breeching, girth, belly band, false martingale and of course reins) all rely on measurements. I have also picked off all the glue visible on the saddle's trim. Nothing like a camera flash to pick up on all of the flaws.

Sunday, January 30, 2011

Skive, skive, skive.

There is lace all over my desk at the moment. Here's just a snippet of some, drying after an application of gum trag.


I spent last night reading through the WEG Diorama Project article in JAH, courtesy of Jennifer Buxton's post.  By the end of it, I was so inspired to start on my harness orders that I think I dreamt about harnesses...

Dan was online last night so we spent a few moments comparing measurements between my four tack models (Smarty Jones, Ideal, Lady Phase and Lonesome Glory) and her Eberl Ricardo resin, whom the set will be for. She determined that Ricky is about 2cm bigger in all measurements than Smarty, so I will be roughly building the harness on him - with measurements for back-up, of course!

Since I have made a couple of classic harnesses based on the Zlico ZGB harness, that's what I'll be using again. It's a nice multi-purpose harness designed by George Bowman, one of the world's top drivers. It can be switched from single to full with a few additions, and is nice enough to use for dressage and cones, but strong enough for marathon. So if Dan decides to enter Ricky into marathon as well, all she needs to do is switch out the cart. Easy!

I've ordered my bits from TWMHC, along with some racing stirrups (before they sell out again) and hames for Lisa's collar harness. They'll get here in about a week to a week and a half, but in the meantime I have plenty of prep-work to do. There's lace to skive and treat, as mentioned above, and I also need to experiment with a tongue-buckle bridle. There isn't much point in doing a slip-buckle bridle with a tongue-buckle harness!

I am lucky with the ZGB harness though. This is the bridle:


See on the crownpiece how there are extra layers on the poll? And remember how I have whined about 4.5mm lace being too wide for RR's buckles? Now I have a solution (for this harness at least)! I can just attach two 2mm strips of lace side by side onto another layer, thus resulting in a bridle with 2mm straps that fit through the buckles. Yay! Obviously this method won't work on regular bridles, so I still need to find some 3.5mm or 4mm lace for that, but for harnesses I shouldn't have any trouble with this. Lovely!

Tuesday, January 11, 2011

New Year orders

Part 2 of Dan's Christmas present was a racing set to go with part 1 (NIB Ruffian). She kindly left the colour choice up to me, so after finding an awesome picture of a yellow bridle on a dark bay (which of course I can't find now), I decide to go with yellow, white and black. But one problem. I don't have enough yellow leather! Oops. So I've ordered it and while waiting for it to arrive, I got started on the saddle.

Dan asked me to make the saddle smaller than my previous one, so out came the paper and pencil. I now have a Smarty Jones tack model (thanks, Lisa!) rather than Ideal, so I think this saddle is more correct.


Above the new pattern is laid over the old; you can see there is more definition in the pommel and the flaps.

Something I had wanted to try after crafting the first saddle for Lisa was a tree of some kind. I didn't like how the first saddle was perpetually flat, and I worried how it would sit on a model with a more defined wither, like Smarty.

I admit I don't know the first thing about trees, or how to attach the leather, or what type of glue to use. This is part of the reason why I've been so reluctant to get into saddles for so long.

Last year I had ordered some aluminium sheets from Oakridge Hobbies, after reading Jennifer Buxton's tutorial on roller buckles. Oakridge had two sizes, 0.008" (which was the size Jennifer recommended for the rollers), and 0.016". I bought both, cause they were cheap (sucker for a bargain), and the larger size might come in useful. That's actually what I used for this saddle's tree.
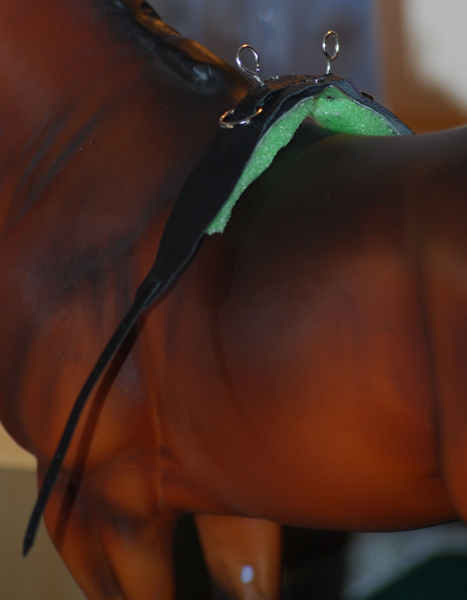
I traced the pattern onto the tin with permanent texta, then cut it out with regular scissors, making sure it was slightly smaller than the pattern (so it wouldn't show). To get it into shape, I bent the front section into a vague saddle-like shape by pressing it against my cutting mat. The tin is kind of stiff so it took a little bit of effort, and means the saddle shouldn't bend out of shape too easily, but should be able to be shaped to the horse without too much trouble.


Next came the underside leather. For some reason I traced off the tree, not the paper pattern, so I didn't cut flaps. I have durr moments sometimes. :P I added flaps after I glued the tree to the underside leather (after roughing the tree with a nail file and using my trusty Selley's Super Glue gel), and they aren't visible unless you turn the saddle over.


 Next came the attachments for stirrups, and the girth billets.I copied the method I used for Lisa's saddle - two d-rings attached to a strap for the stirrup rings, and one long strap (with a wider strap over the top) to act as girth billets and the buckle protector thing (there's a name for it but its purpose is to cushion the jockey against the girth's buckle).

At this point I also cut the slits for the surcingle (angled up towards the pommel), and threaded the stirrup leathers. Ignore the temporary D-ring stirrups, hehe!


My TWMHC order arrived yesterday, so I was able to add stirrups to the saddle. And here's where we are at the moment: wearing a temporary surcingle while I wait for the yellow leather to arrive! I do need to put trim around the edge of the seat, and on the pommel, too, but that won't take long.


In other news, I have somehow signed myself up to make five harnesses within the next few months. All are traditional, except for one lone classic harness (which is for me). Lisa needs three, and there's a marathon harness for Dan. I can start Dan's harness immediately, as it will be made to fit Ideal, but Lisa's will have to wait until I can go to her place and measure her resins. One of her harnesses may also feature a collar, courtesy of the tutorial in Model Horse Magazine number 8. I really am stepping out! The tutorial sounds pretty easy so I am kind of looking forward to it.