Showing posts with label saddles - racing. Show all posts

Monday, October 15, 2012

Nylon surcingle and girth

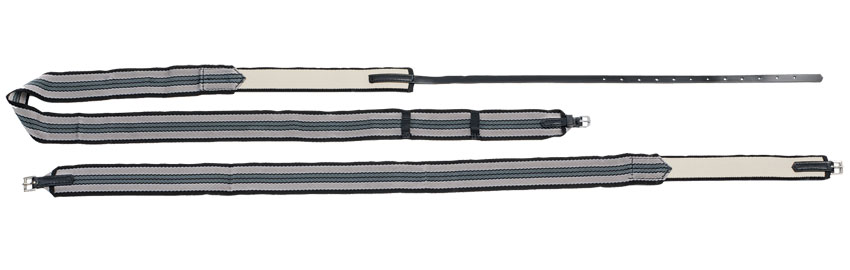
Last night I finished my first attempt at the featherweight racing surcingle and girth, using 6m grosgrain ribbon. I don't think they turned out half bad!

I was really taken by the yellow ('Daffodil') colour when it arrived, so I opted to create a yellow and black set for Ruffian. As I mentioned in my last post, I wasn't entirely sure if I would be able to create a seamless transition from the elastic insert to the nylon, plus I didn't know if superglue would be enough to hold them together. So I secured the end of the elastic with superglue, and the end of the nylon with Helmar Fray Stoppa, and when they were dry, sewed them together.

Have some crappy iPhone photos.


(No, I can't sew, so sue me. :P)

Then I wrapped the join in leather and superglue, mostly as extra security to keep it all together, but also to protect the model from the scratchy edges of the elastic and ribbon.


Ta-da! My first join. :)


I don't like how the grain on the two pieces goes in different directions, but that can't be helped.

Unfortunately the first join was in vain, as the resulting girth...


ended up being too short. Oops!


But it was good practise for finishing off both the girth and surcingle. I even managed to put (non-working) rollers on all the buckles so it does up a little easier.

The finished set:


I tried using 1.5mm nailheads on the surcingle to replicate the studs on the real surcingles, but I think they are just too big for model scale. They don't look terrible per se, just not good enough to use again in the future. On the plus-side, I think the 2mm strap looks much better than the 3mm I've been using previously!

When I get some racing stirrups (when I have cash lol) I will be selling this set.

Saturday, October 6, 2012

Racing surcingles

Speaking of racing tack... I use 6mm elastic for my racing surcingles and girths, which unfortunately limits the colour combinations as I can only find it in black or white. (There are no craft stores near me any more so I have to buy just about everything online, mostly form eBay.) And you know how colour-coordinated model people like to be!

In my on-going research of model tack, I sometimes come across surcingles (overgirths) and girths that are synthetic and have elastic inserts, like this:


Right now, I don't like the way I have keepers on my surcingles. The method is basically a long strip of leather with (usually contrasting) keepers around it. It does the job, but I don't like the way it looks. It's difficult, if not down-right impossible, to attach keepers directly to the elastic like in the photo below - their narrowness, and the stretchiness of the elastic, means they generally don't last long (and the glue hardens the elastic, which can cause a potential scratching issue on models).


So what I'd like to try is creating a surcingle that has the elastic insert, but also has the keepers directly attached. And I think the way to do this is with grosgrain ribbon (the nylon ribbon some tackmakers use for halters) in 6mm width.

The benefit of having a synthetic girth on models allows for more colour combinations - and what could be better than that? And when I get my hands on some vertically-striped grosgrain from the States (just look at these beauties here), I'll be able to do stripey combos as well.

My only concern right now is the nail heads on either side of the keepers. I'm thinking I'll either need to drop the surcingle strap to the 2mm leather instead of 3mm (will probably help with the perspective of scale too) to fit the 1.5mm nailheads on, or revert to silver ink to simulate the nailheads. Oh, and how to attach the elastic to the grosgrain without causing a lot of bulk. Hmm!

CM Order: Green/White Racing Set

Just finished at midnight last night. The pics have been sent to the customer; hopefully she likes it! This set will be used on her chestnut Affinity resin. This set will be jetting to the US with the red/black set I had on MHSP; both are going to the same owner, and will be my first sets in the US. Exciting!

(Just realised it's missing nailheads. Face palm! They will definitely go on right now!)


Wednesday, February 2, 2011

*sigh*

My glue died.

I hate when this happens.

And of course it always happens when I'm in the middle of making something. Murphy's law, eh? (For what it's worth, this house was built by a Murphy, and the previous owners were Murphys, so I think we are fairly well steeped in it by now.)

I'm on my last tube of Duco Cement, but I don't think I'm too upset. Next week I will hit up Kmart, Big W, Safeway, Coles and Riot Art, buy all the glues I can find that are reasonably priced and seem like they might do a reasonable job, and then come home and experiment.

Really, I'm not a huge fan of Duco - it doesn't really dry clear, it's really runny (especially when it's a warm day), and just tends to go everywhere. I have been considering investing in a dispenser like this or like this, as the nozzle on most glue tubes is far too big and you have little control once the glue decides to come oozing on out. I have heard of some tackmakers squeezing out a small amount of glue at a time onto a piece of paper and then using a toothpick to apply it, but since Duco dries fairly quickly, this method thus far hasn't worked for me. Maybe I can try this again if I find another glue that I like that takes a little longer to dry.

In other news, Dan received her racing set gift from me and not only is it (almost) a perfect fit, but she's really thrilled with it. :D Not bad for working off measurements! Only the browband needs to be adjusted, which is an easy job and should only take a few minutes. The saddlepad is from another set; Ruffian, show name Miss Melbourne, will eventually have a white saddlepad.


Next up for Dan will be another racing set, this time for Smarty Jones - a much easier task, seeing as I actually own a Smarty! I'm not sure on colours yet, but I think green will be nice on him.

The Western halter order from a few posts down has been received as well. I was a bit anxious about this order - always am when an order is made purely from measurements. Thankfully the halter looks excellent and has no issues with fit! The customer has promised photos for the blog, so I hope to share them soon.

I've started making progress on the harness orders. Lisa has dropped her order down to one harness for now. Both she and Dan are ordering trad spider phaetons from Cheryl Campbell of Argyle Farm. I still haven't managed to get up to Lisa's yet to take measurements, so I've started working on what little I can. So far for hers I have done the trace carriers, and prepped heaps of lace. I've got a little further on Dan's; as well as trace carriers, I've started the hanging buckles for the breastplate and breeching, started to work on the saddle, and tonight I started on the bridle since I now have measurements.

With these harnesses, I get to try a new method of stuffing for the saddle. Earlier in the year I purchased a pool noodle, whose foam will be used underneath the saddle. Hopefully. It's a nice dense foam that mostly holds its shape even when the girth will be done up (the stuffing I used on my classic harness last year collapsed as soon as the girth was buckled), and so should give a nice outline. Hopefully it won't be killed by any glue I need to use on it!

Saturday, January 22, 2011

Yellow

T"he more I've worked on this bridle for Dan, the more convinced I am that Smarty Jones was made for this colour. But I bet if I make a donation bridle in this colour, the person who received it would not have a Smarty, so I think I'll wait and hope that someone will just order one instead. :D

Speaking of orders, here's a Western halter order, made to fit Zippo (hopefully! I had to work off measurements). I was surprised to note that this is the first Western halter I've made on this dark brown colour.  I think it came out very nice anyway, and will be in the mail soon for its new owner. I added silver tips to the crownpiece after these photos were taken.


Back to Dan's bridle. The entire set is FINISHED! (Unless she wants to change something else. :P)


It's made to fit Ruffian, who I no longer have, so this is mostly made from measurements.


She has a longer head than Smarty,  but these pictures are on him as Dan also has a Smarty and she can compare that way. Fingers crossed it will fit!


 I did originally make it with buckle reins, but Dan changed her mind.


Here it is on Mr Long Head, Lonesome Glory.


My donation for the Down Under Nationals show (the Australian equivalent of NAN) will be a racing set, so it's nice to get some more practise in before I start on that project.

Tuesday, January 11, 2011

New Year orders

Part 2 of Dan's Christmas present was a racing set to go with part 1 (NIB Ruffian). She kindly left the colour choice up to me, so after finding an awesome picture of a yellow bridle on a dark bay (which of course I can't find now), I decide to go with yellow, white and black. But one problem. I don't have enough yellow leather! Oops. So I've ordered it and while waiting for it to arrive, I got started on the saddle.

Dan asked me to make the saddle smaller than my previous one, so out came the paper and pencil. I now have a Smarty Jones tack model (thanks, Lisa!) rather than Ideal, so I think this saddle is more correct.


Above the new pattern is laid over the old; you can see there is more definition in the pommel and the flaps.

Something I had wanted to try after crafting the first saddle for Lisa was a tree of some kind. I didn't like how the first saddle was perpetually flat, and I worried how it would sit on a model with a more defined wither, like Smarty.

I admit I don't know the first thing about trees, or how to attach the leather, or what type of glue to use. This is part of the reason why I've been so reluctant to get into saddles for so long.

Last year I had ordered some aluminium sheets from Oakridge Hobbies, after reading Jennifer Buxton's tutorial on roller buckles. Oakridge had two sizes, 0.008" (which was the size Jennifer recommended for the rollers), and 0.016". I bought both, cause they were cheap (sucker for a bargain), and the larger size might come in useful. That's actually what I used for this saddle's tree.

I traced the pattern onto the tin with permanent texta, then cut it out with regular scissors, making sure it was slightly smaller than the pattern (so it wouldn't show). To get it into shape, I bent the front section into a vague saddle-like shape by pressing it against my cutting mat. The tin is kind of stiff so it took a little bit of effort, and means the saddle shouldn't bend out of shape too easily, but should be able to be shaped to the horse without too much trouble.


Next came the underside leather. For some reason I traced off the tree, not the paper pattern, so I didn't cut flaps. I have durr moments sometimes. :P I added flaps after I glued the tree to the underside leather (after roughing the tree with a nail file and using my trusty Selley's Super Glue gel), and they aren't visible unless you turn the saddle over.


 Next came the attachments for stirrups, and the girth billets.I copied the method I used for Lisa's saddle - two d-rings attached to a strap for the stirrup rings, and one long strap (with a wider strap over the top) to act as girth billets and the buckle protector thing (there's a name for it but its purpose is to cushion the jockey against the girth's buckle).

At this point I also cut the slits for the surcingle (angled up towards the pommel), and threaded the stirrup leathers. Ignore the temporary D-ring stirrups, hehe!


My TWMHC order arrived yesterday, so I was able to add stirrups to the saddle. And here's where we are at the moment: wearing a temporary surcingle while I wait for the yellow leather to arrive! I do need to put trim around the edge of the seat, and on the pommel, too, but that won't take long.


In other news, I have somehow signed myself up to make five harnesses within the next few months. All are traditional, except for one lone classic harness (which is for me). Lisa needs three, and there's a marathon harness for Dan. I can start Dan's harness immediately, as it will be made to fit Ideal, but Lisa's will have to wait until I can go to her place and measure her resins. One of her harnesses may also feature a collar, courtesy of the tutorial in Model Horse Magazine number 8. I really am stepping out! The tutorial sounds pretty easy so I am kind of looking forward to it.

Saturday, October 23, 2010

Sales and new homes.

My test racing saddle from the previous post has found a new home. I originally sent it to Lisa so she could take some pics of it on Ruffian and other Breyer TBs for me, but then we agreed that since it was better than the original copy I made for her (based on her blue saddle), she may as well keep it. Yay!

Part of the deal was that she wanted a girth and surcingle in red and white to go with the red and white gaming bridle she purchased from me a little while back. This set is destined to go on a light grey CM Ruffian (who is lovely), and I bet the whole set up will just look stunning.


You can see that the surcingle buckle has a roller on it. I've attempted rollers on several occassions after reading Jennifer Bruxton's post about them, but I don't know, I must be doing something wrong. I can never seem to make the rollers actually roll when a strap is passing through. On their own they roll okay, so I'm really confused! I do find that even having a non-functioning roller on there eases the stress on the strap, so I'll definitely leave it on Lisa's surcingle. (Thought: maybe my needlenose pliers are too big to make a properly-sized tube.)


The girth came out a little bit funny with the binding around the buckle. What I did with the original black girth was take a piece of black 6mm leather and fold and glue it to both sides of the elastic end, with the buckle poking through the middle. This also provided space for the girth keeper to be attached easily.


With the red, I didn't have any red 6mm so instead I used a little piece from my dwindling collection of coloured pieces, and wrapped it around the end of the girth. As you can see it didn't leave any neat space for the keeper! Superglue was used with this girth so unfortunately it's not just a simple case of pulling the leather off and trying again - that leather is there for good! Instead I attached keepers and then glued an extra piece of leather onto the back to hide the ends. In the future I will definitely fold and glue like I did with the black leather, though.

In other news, I've been a little quiet on the post front as I've been busy making and revamping finds from my completed basket to be offered for sale. Here is one bridle that I am really pleased with:


It's a classic Western snaffle. I searched long and hard for those twisted fancy jump rings, and eventually found some sterling silver ones on ebay (also in 3mm!). Unfortunately the jump rings are quite soft and very easy to bend, so I'm not sure if I will keep using them. I'm not sure why I like it so much - perhaps it's the little 'Chicago screws' near the bit. I think they look really cute, even if they are technically a bit big.

This tack sale is to raise funds so I can purchase a whole lot of cast bits from TWMHC while the Aussie dollar is still good. 98c, yo!

There's a live show coming up in a few months in NSW that I should probably make a donation piece for, as well as LITW in WA, which I will hopefully be proxying at. A hacking bridle with ribbon browband would be nice, but I don't have any Weymouth bits in stock. It may end up being a Western bridle or halter for both. :/

Thursday, October 14, 2010

Congratulations, it's a saddle!

It's a little bit silly how thrilled I am at completing my first saddle. For a couple days' work, I am very pleased with how it came out!

I received some larger pieces of 'roo leather a couple of days ago, and so I could finally make a start on the racing saddles I had promised to friends Lisa and Dan. So, using the pictures I had from Dan of a racing slip (including underside shots!) I was able to construct a pattern (held on here by the surcingle of the other racing saddle Lisa owns).


From there came a prototype.


Here you can see the stitchmarking I attempted (on the saddle I copied this from, the stitching is white). I also tried to full binding around the entire circumference of the saddle. Unfortunately that didn't work out so well - I ended up with glue everywhere. The little cut outs that cover the stirrup bars are also wonky, since I cut them freehand.


That's where I started from this morning. Today I redrew the patterns (adding in the surcingle slots and stirrup cover things, and started afresh.


While I was hassling discussing the project with Dan, we determined that the surcingle I was borrowing from Lisa's saddle was too wide (at about 9-10mm). I had a dig around in my supply box and found some 6mm elastic, which I used to create a new girth and surcingle.


(I'm pretty sure the surcingle is on upside down. Oops!)


I also tried the binding again, but only around the important bits (the seat and the pommel). I like the finished look it gives the saddle - from the side, at least. I need to work on being more careful and making sure it goes on straight!

While I was playing with Lisa's saddle, I also determined that tongue buckles on the girth and surcingle are much easier to use when working with elastic. Slip buckles literally slip out, so tongue buckles it is - all over!


My final note for the future is that I should probably use 2mm for the stirrup leathers; of course, I didn't think of that until after I was taking pictures. Oh well!

I think that despite a few glue marks and wonkiness, it's a pretty impressive saddle for me. It should make a good photo-showing saddle, too, if I can hold off from pulling it apart to reuse the stirrups!